

For many residential reverse-osmosis systems, the empty storage tank is precharged to roughly 5–7 psi. But that is not a universal setting: tank size and system design vary, so the manufacturer’s manual is the authority for your model.
Pressure must be measured with the tank completely empty of water. Measuring a full or partly full tank produces a different reading and can lead to a bad adjustment.
Before you adjust the tank
- Find the system and tank manuals and note the specified empty-tank precharge.
- Use a low-pressure gauge that reads accurately in the 0–15 psi range.
- Use a hand or bicycle pump. A high-volume compressor can overpressurize a small tank very quickly.
- Wash your hands and keep the faucet and valve area clean.
- Do not loosen plumbing fittings while the system is pressurized.
As examples—not universal specifications—Global Water Solutions lists a 7 psi precharge for one 2.1-gallon RO tank, while an Excalibur residential system manual specifies an empty-tank precharge of 5–7 psi. Always use the number for your own tank and system.
Symptoms that can point to a pressure problem
Low flow at the RO faucet is the usual clue, but it does not prove that tank pressure is wrong. Clogged filters, low feed pressure, a closed valve, a kinked tube, membrane fouling or a faulty automatic shutoff can produce similar symptoms.
- A useful initial flow that quickly falls to a trickle may indicate low air precharge or a waterlogged tank.
- Very little stored water can result from excessive precharge, low feed pressure or another system fault.
- Frequent cycling or water continuing to drain may involve the shutoff valve, check valve, membrane or tank pressure.
- Water emerging from the air valve usually indicates a failed internal diaphragm or bladder; the tank normally needs replacement.
How to check reverse-osmosis tank pressure
- Shut off the feed-water supply. Close the valve that supplies the RO system.
- Close the tank valve if the manual directs you to isolate it, then open it for draining. Valve arrangements vary, so follow the system diagram.
- Open the RO faucet. Drain the tank until water stops. Collect usable water if desired.
- Keep the faucet open. The water side must remain unpressurized while you test.
- Remove the cap from the tank’s Schrader air valve. This looks like a tire valve and is usually opposite the water connection.
- Press a low-pressure gauge squarely onto the valve. Read the pressure only after the tank is empty.
- Compare the reading with the manual. Do not substitute a generic target when the manufacturer provides one.
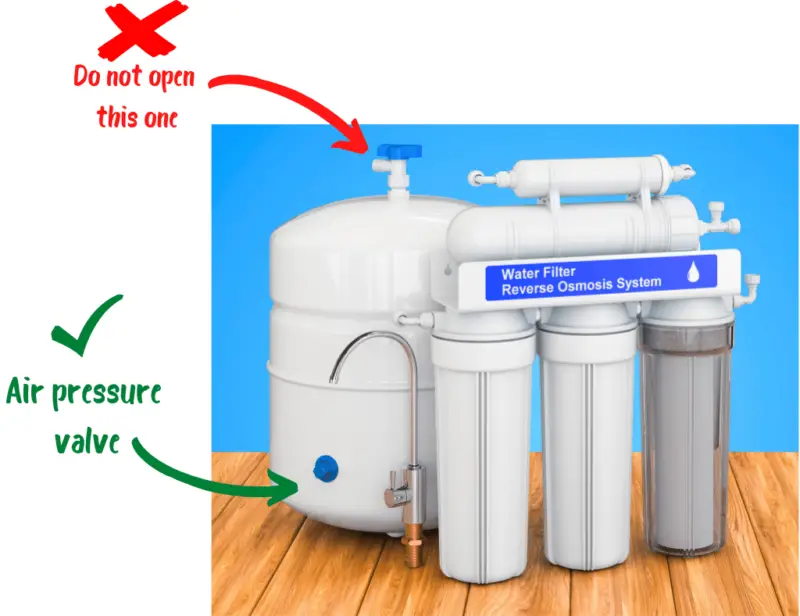
How to repressurize the tank
- Leave the feed water off and the RO faucet open. This lets residual water leave as air is added.
- Add air in small increments. Use a hand pump and pause often.
- Allow water to drain. Adding air may push out water that remained in the tank.
- Recheck with the low-pressure gauge. Stop at the empty-tank value specified by the manufacturer.
- Replace the valve cap and close the faucet.
- Open the tank valve and feed-water supply. Check all disturbed areas for leaks.
- Allow the system to refill fully. This may take several hours. Then test faucet flow.
Do not exceed the tank’s marked maximum pressure. If you accidentally add too much air, release it in very short taps and measure again. If the valve leaks, the tank is damaged or you cannot identify the correct specification, stop and contact the manufacturer or a qualified water-treatment technician.
What the pressure tank does
A typical RO storage tank separates product water from compressed air with a flexible diaphragm or bladder. As filtered water enters, it compresses the air. Opening the faucet lets that compressed air push water out at a useful flow rate.
The empty precharge is only the starting air pressure. Pressure rises as the tank fills. The amount of water delivered before flow slows depends on feed pressure, shutoff design, tank volume and precharge—not simply the tank’s advertised physical volume.
When adjustment will not fix the problem
- Water comes from the air valve: the diaphragm or bladder has failed.
- The tank will not hold air: the valve core or tank may be leaking.
- Pressure is correct but flow is poor: inspect filters, tubing, faucet and feed pressure.
- The system runs continuously: investigate the automatic shutoff valve, check valve, membrane performance and leaks.
- The tank is corroded, dented or bulging: isolate and replace it; do not attempt a repair.
How often should pressure be checked?
There is no need to release water merely to check on a rigid schedule unless the manual calls for it. Test the precharge when symptoms appear, after work that required draining the tank, or during the maintenance interval specified by the manufacturer. Repeated loss of pressure signals a fault rather than normal maintenance.
Related RO maintenance
Tank pressure is only one part of the system. Work through the broader reverse-osmosis troubleshooting guide, replace cartridges using a hygienic filter-change procedure, and investigate unexpected taste or odor rather than assuming the tank is responsible. Our overview of RO system maintenance explains the other routine checks.
Bottom line
Measure only when the tank is empty, use the manufacturer’s specified precharge and add air slowly with a hand pump. A generic 5–7 psi range is common for small residential tanks, but the label and manual for your equipment take precedence.






I have a 10 gallon tank in the basement that pushes the water up about 12 feet to my RO faucet in my kitchen sink. What should I set the empty tank pressure to? 7 to 11 psi or higher?
Thank you for taking the time to write this.
InStep 6 you said closed the valve but I have three valves I got the water valve that comes in from the water line I got a valve from the filter and I got a valve on top of the tank what is the valve that is so confusing I wish you could be more specific
@Bruce It’s the valve “going nowhere”, just sitting on the outside of the tank with no connection to a line. Mostly, it has a blue cap.
Your welcome. Thanks for leaving a comment.